Early season tree stand hunting for whitetails brings many things to take care of, and being mobile while hunting is one of them. If you’re able to react fast to the always-changing travel patterns of the bucks, position of waterholes and hot food resources, your chance to get that shot increases significantly.
There are many things to try for improving your efficiency and mobility, but none of them is as efficient as carrying the whole gear arsenal (stand, backpack, bow, and climbing system) with you all the time. You will need a specialized pack for that kind of performance, one that may also hold the hang-on tree stand, a loaded backpack, four climbing sticks, and your bow. Finding a pack that does it all is difficult, especially when your money is tight.
If you’re the handy and DIY type of hunter, you will need some skills and patience to build a customized backpack that fits all your needs for tree stand hunting. Frankly, making such a backpack isn’t very complicated, and it’s definitely not expensive.
When it comes to public bow hunting, many things will be challenging to obtain. Often, success comes from paying attention to stand entrance and exit methods, which usually takes to more complex and longer routes. When you add a custom and versatile tree stand pack to your hunting equipment, you will be able to move faster and easier and obtain success sooner than in the past.
Without any further ado, here are the steps to take for making your “new” backpack/gear hauler:
Page Contents
1. Look for an old backpack
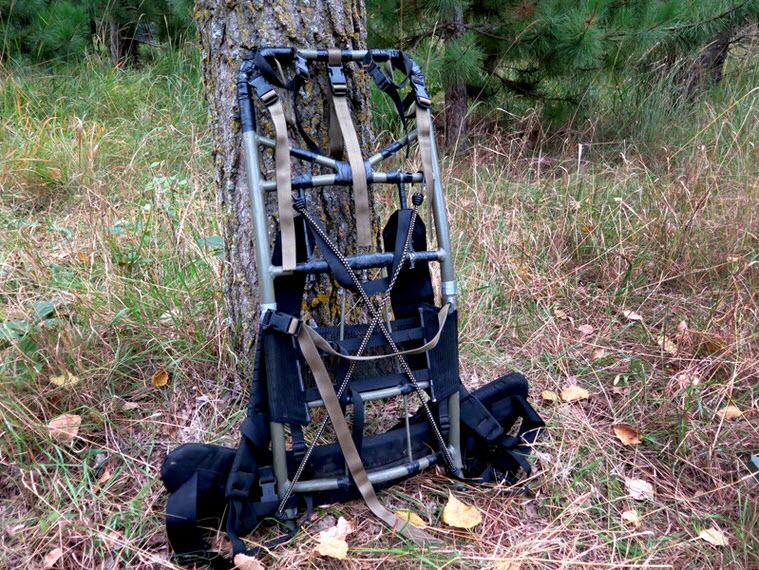
For this sort of project, a backpack with an external aluminum frame makes the best choice. You should be able to find one for a bargain price at a garage sale or online sites if you don’t have an old one forgotten in the attic. Hunting style, freighter style backpacks are also perfect; it should be a backpack with a comfortable hip area and padded shoulder straps. You will carry heavy loads with it, so you shouldn’t skip on the comfort aspect.
2. Strip the backpack down to the frame
You have to remove the bag if the old frame has one; you will only use the frame for your project. If the frame comes with some meat shelf, you should remove that too. If you plan to haul deer quarters with the new gear hauler, you could leave it.
3. Gather your tools
For this project, you will also need 14 ft of 1-inch nylon webbing (don’t be cheap and buy the good kind), 26 aluminum rivets with 52 aluminum washers, six 1-inch quick release buckles. You will also need a butane lighter and a rivet tool. You should pay less than $35 for all of the supplies and tools.
4. Prepare the straps
You may begin building by cutting the nylon webbing into seven 2-foot parts; use the lighter to burnish the ends so that they don’t fray.
5. Make straps and buckles
You will have to attach the stand to the right and left side of the frame, but you will need buckles and two straps for that. You will also have to add straps and buckles for attaching climbing sticks. Continue installing a top-center strap with buckle to secure the loaded pack; add two straps close to midway down the frame, on both sides. These straps will help you stabilize the load horizontally.
You have to use two rivets for attaching the straps and rivets also for attaching the quick-release buckles.
The most challenging part of this phase is the pre-drilling, making the holes in the thick webbing; a heated bodkin will help you do a better job melting holes for the rivets.
6. Make the rivet holes
While you’re making the rivets’ holes, you can use paper clips to stabilize the nylon webbing. Take your time because you will need to go with the bodkin tip through the lighter’s flame a couple of times until it’s hot enough to make a hole in the thick webbing.
You will also have to use the clips to keep the straps in place while you’re making holes to take the rivets later.
For a durable and robust bond, look for two aluminum washers (front and back) with the rivet. It will be tighter that way.
Truth be told, it’s rather tricky and time-consuming to make the holes with the heated bodkin, so if you have a wood-burning tool or a hobby welder, don’t hesitate to use it. You will work a lot faster because it burns holes through the nylon webbing very fast.
7. You’re almost done
It would help if you didn’t hurry when burning the holes for the rivets. Take your time when attaching the webbing straps with rivets.
Keep in mind that the last set of straps should be connected close to the midway down of your frame; there should be a two-foot strap on every side, and a quick-release buckle for every connection.
8. You’re done!
The new backpack/gear hauler will hold a stand, four climbing sticks, and a wholly loaded day pack. The only thing to do now is to put it on, grab your bow, and head on to your hunting spot.
How can you comfortably carry your new backpack?
Even if your new backpack is versatile and will help you when hunting whitetail, you still need to aim for comfortable carry. If the whole plan seems too complex for you and you decide to carry both a backpack and a treestand, you need to do some research first.
Effort and struggle to lug the load into position at your hunting spot is one of the main elements when choosing between climbing and hang-on stands. Should you think about carrying the stand in one hand and the pack on your back, you will have to reconsider—it will be incredibly painful and uncomfortable to hike like that to your hunting spot. By the time you’re done installing the stand and your gear, you will be exhausted. There’s no way you will be able to focus and watch your whitetail for hours until you get to take that final shot.
It’s more than obvious that carrying both the pack and the stand-in your hand isn’t beneficial. The load isn’t secured and the weight distribution isn’t even. If the weight distribution is efficient, you will be able to walk a lot more comfortably and you won’t feel drained out when you get to the hunting spot.
You have to place most of the load high on your back and seek to distribute the load on your chest and back evenly. An even distribution on both sides of shoulder straps will help in some situations. If the load is secure, you will walk easier and quieter. You won’t have to make adjustments every two steps and you will be able to change direction smoothly.
To comfortably carry your backpack, we recommend you start by buying padded shoulder straps/harnesses and set them to your tree stand. Details come next:

Buy universal treestand carry straps
You will see that it’s challenging to go past molle shoulder straps. We recommend you pick a backpack with wide straps or even a climbing carabiner to attach your stand to the pack securely.
Use bungee cords to attach the backpack to the climbing stand
Bungee cords are elastic cords encased in thermoplastic polymer or woven cotton. They’re excellent at securing objects and you can use them to attach the climbing stand to the backpack.
How should you do the attachment?
Begin with getting two bungee cords and attach your pack to the climbing stand. You might want to use a piggyback system to secure the backpack; regardless of the method you choose, you need to make sure that the weight distribution for the pack is even. Otherwise, it will keep moving around while you walk and significantly alter your comfort.
Once you’re done with the attachment, it’s going to be more comfortable to carry the tree stand on your shoulders while your backpack is safely attached to the stand. To improve the security, you can also use the backpack’s chest and hip straps and even the retention strap.
Balance your load
You can wear the backpack on your chest and the climbing stand on your back. This way, you will efficiently protect your back. Carrying the gear hauler/backpack and tree stand can be exhausting when you hunt for days. Holding both the pack and the stand or the new backpack/gear hauler on your back will put a lot of stress on your spine. This is why weight distribution is such an important aspect to examine.
Uneven weight distribution alters your stability which can cause exhaustion and even injuries. Therefore, you need to protect your back as much as possible by distributing the weight of the load. You can carry the pack on your chest and the tree stand on your back.
The most effortless way to carry them like that is first to put the backpack on your chest with straps. Go with the straps over the front of your shoulders. Continue with putting the climbing stand straps over your shoulders like you typically would.
Use hip and chest straps to attach the pack to the climbing stand
Another system to comfortably carry the backpack and climbing stand on your back is attaching the pack to the stand with the chest and hip straps. The hip and chest straps are effective at securing the backpack and stand. You might not need bungee cords.
How to attach the pack?
Seek that the weight distribution is even with the backpack. Place your bag to the climbing stand and attach it like you put the pack on your back. Continue with placing the shoulder straps over the climbing stand’s tip. Secure the top and bottom by buckling the hip and chest straps. You also have to strap the climbing stand attached to the backpack before carrying on with your walking.
Decrease your carry weight
The lighter the load, the easier it will be for you to move and hike. Instead of carrying a backpack, you can have fanny packs and coat pockets. Carrying the tree stand will be more comfortable when using these alternative options.
You should start with removing all items that aren’t crucial for your hunting. It’s mandatory to reduce the weight of your load as much as possible. You can get creative and use your clothing pockets to store small hunting gear and miscellaneous.
Now that your pack is lightweight, you might not even need a backpack for hunting. Consider using a fanny pack (or two) and attach large items such as climbing sticks and clothing to the tree stand using bungee cords.
Use this method because it’s effortless and quiet. Additionally, it comes to be the most efficient method when you don’t want to carry numerous items.

In a nutshell
We know that carrying both your backpack/gear hauler in your hand seems like the most obvious solution. However, you will need to walk for miles with things in your hand. By the time you get to your hunting spot, you will be drained out and unable to focus on your hunt.
Think of carrying the pack and the tree stand at the same time by turning your backpack in a gear hauler. Alternatively, you can attach the bag to the stand, carry the pack on your chest and stand on your back, or simply go with fanny packs after reducing your load.


